Cascade Carvers       https://cascadecarvers.com
[Skip to Content]

Articles/Publications

How to carve "Golf Ball Buddies" and make exchangeable torsos for the heads.

Image Title: The HOW TO book for great faces
The HOW TO book for great faces

The inside of a golf ball is soft and easy to carve.  When you cut into one, it might be blue, yellow, lavender....you never know.

To make the cut to remove the outer shell, buy two short pieces of PVC.  1-1/4" Joint Sleeves work great.  They fit tightly to two sides of the golf ball, leaving an opening for the coping saw blade (recommended) or one can use a band saw. 

"The Little Book of Carving Golf Ball Buddies" can teach you the classic cuts for eyes, nose, and lips that are useful for making faces in any medium.  Part number 47-3235, $9.95. 
You can have a lot of fun experimenting on your own, creating faces or animals or art designs in the golf ball.

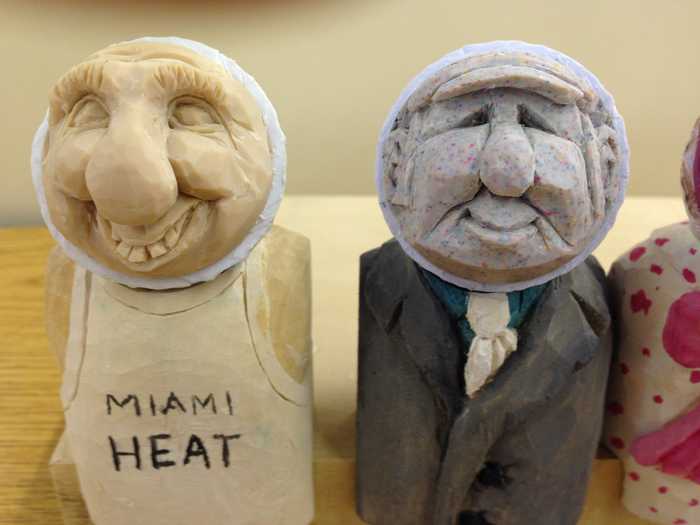
After you make a few faces, you might like to create a few torsos like you see in the picture.  Basswood is good for carving because it has very little Grain and is not too hard of a wood.  Cut a piece 2" X 2" X 3".  Draw a semicircle with your pencil, in the middle of the top of the wood, and carve it out to be a seat for the golf ball.  Round the edges of the wood into a jacket form.  Use your pencil to draw the details of a collar and tie, or a bow, or straps and buttons, whatever kind of torso you choose.  Carve in those details and be sure to add a little paint.

The most satisfying painting comes from a "Wash."  Put a few drops of paint on a saucer, and add drops of water until the paint is thinned out at about 50/50.  Several coats of this "wash" is often more attractive than a layer of paint, and it is also easier to cover the whole piece and lead from one color to the neighboring color.  Quite a few carvers have a collection of Golf Ball Buddies.  When you see people looking for golf balls along a course, there is a good chance they aren't using them to play golf!

How to Make Sure Your Grinder Lives to a Ripe Old Age!

Cascade Carvers Supply is very pleased to offer the NSK Electer GX high-speed grinder as part of our product line.  The NSK machines have proven their durability through twenty-plus years of use in the tool and die industry, and as a tool for woodcarvers...they're just WOW!  We are also offering the proven line of RAM machines.  They may not have all the patents of the NSK, but they are used by many happy carvers. 

When you own an NSK, or RAM there are some strategies for making it work at its best for you.

Choosing the best Power Carving Burr for the Job at Hand.

Power Carving Burrs 

Based on the number of questions we receive, no other area of carving is as frustrating to the new power carvers as trying to figure which tool to use where. 

 For Roughing to a shape from a Bandsaw cutout, use:

  • Typhoons
  • Fluted Carbides
  • Ruby Carvers
  • Coarse Stump Cutters

 For Smoothing the blank before adding detail, use:

  • Cushioned Sanding Cylinder

For Feather Groups, and Contour definitions, use:

  • Ruby Carvers
  • Diamonds
  • Stump Cutters
  • Mounted Abrasives (pink and white stones)
  • Split Sanding Mandrel

 For TEXTURING:     

  • Mounted Abrasives (stones)
  • Diamonds
  • Rubies

Cushion Sanders and Foam Replacement

 Cushion Sanders, and Foam Replacement

Cushion sanders are among the most valuable tools that carvers and sculptors of wood can own. They are wonderful tools for easy sanding of your carved pieces. Like all great tools, you can renew them with fresh sandpaper, and also with fresh foam linings. Thus it becomes important to understand the quick and easy method of replacing the foam pad on the cylinder.

  • Remove the old pad from the cylinder by scraping it off, then applying a little paint thinner to clean the cylinder of any dust and glue.
  • When the cylinder is clean and dry, obtain a small 16 oz. can of contact cement from the hardware store. It will last for years.
  • Apply one coat of contact cement to the cylinder and one coat to the new pad. Let them sit for ten minutes, until the cement appears dry and dull on the foam pad.
  • Start the foam wrap even with the edge of one side of the slot. Do not stretch the pad as you continue around. Any excess, when you are done, may be cut off by running a razor blade down the slot.

* Make sure everything is lined up before you start wrapping. With contact cement, you can't pull it loose and start over again.


Care of Woodburning Tips

Woodburning tips can be sharpened.  Usually they only need to be kept clean of oxidation. Read more to find out how to burn successfully at settings of 3 and 4, and how to get the longest, best use from your woodburning tips.